- Home
- /
- Documentation
- /
- How-to guides
- /
- Get sign-ups for your...
Get signups to your SMS list
Let users subscribe and unsubscribe to lists and groups themselves.
A great feature for your website if you want customers or users to be able to sign up for an SMS list themselves.
There are four options for users to sign up themselves.
- Send an SMS with the text "Register [keyword]" to [+45] 93700701
- Scan the QR code that can be downloaded from the group page (see later)
- Registration page from your own website with iFrame. (see below)
- Sign-up page from your own website with a form (see bottom of this article)
The four options are described below.
Sign up via SMS
You can subscribe to your SMS list by simply sending an SMS to 93700701 with the text Subscribe [keyword]. The group you subscribe to must have a keyword for it to work.
In the menu, select Address Book -> Groups
Click the pencil next to the list you want signups for.
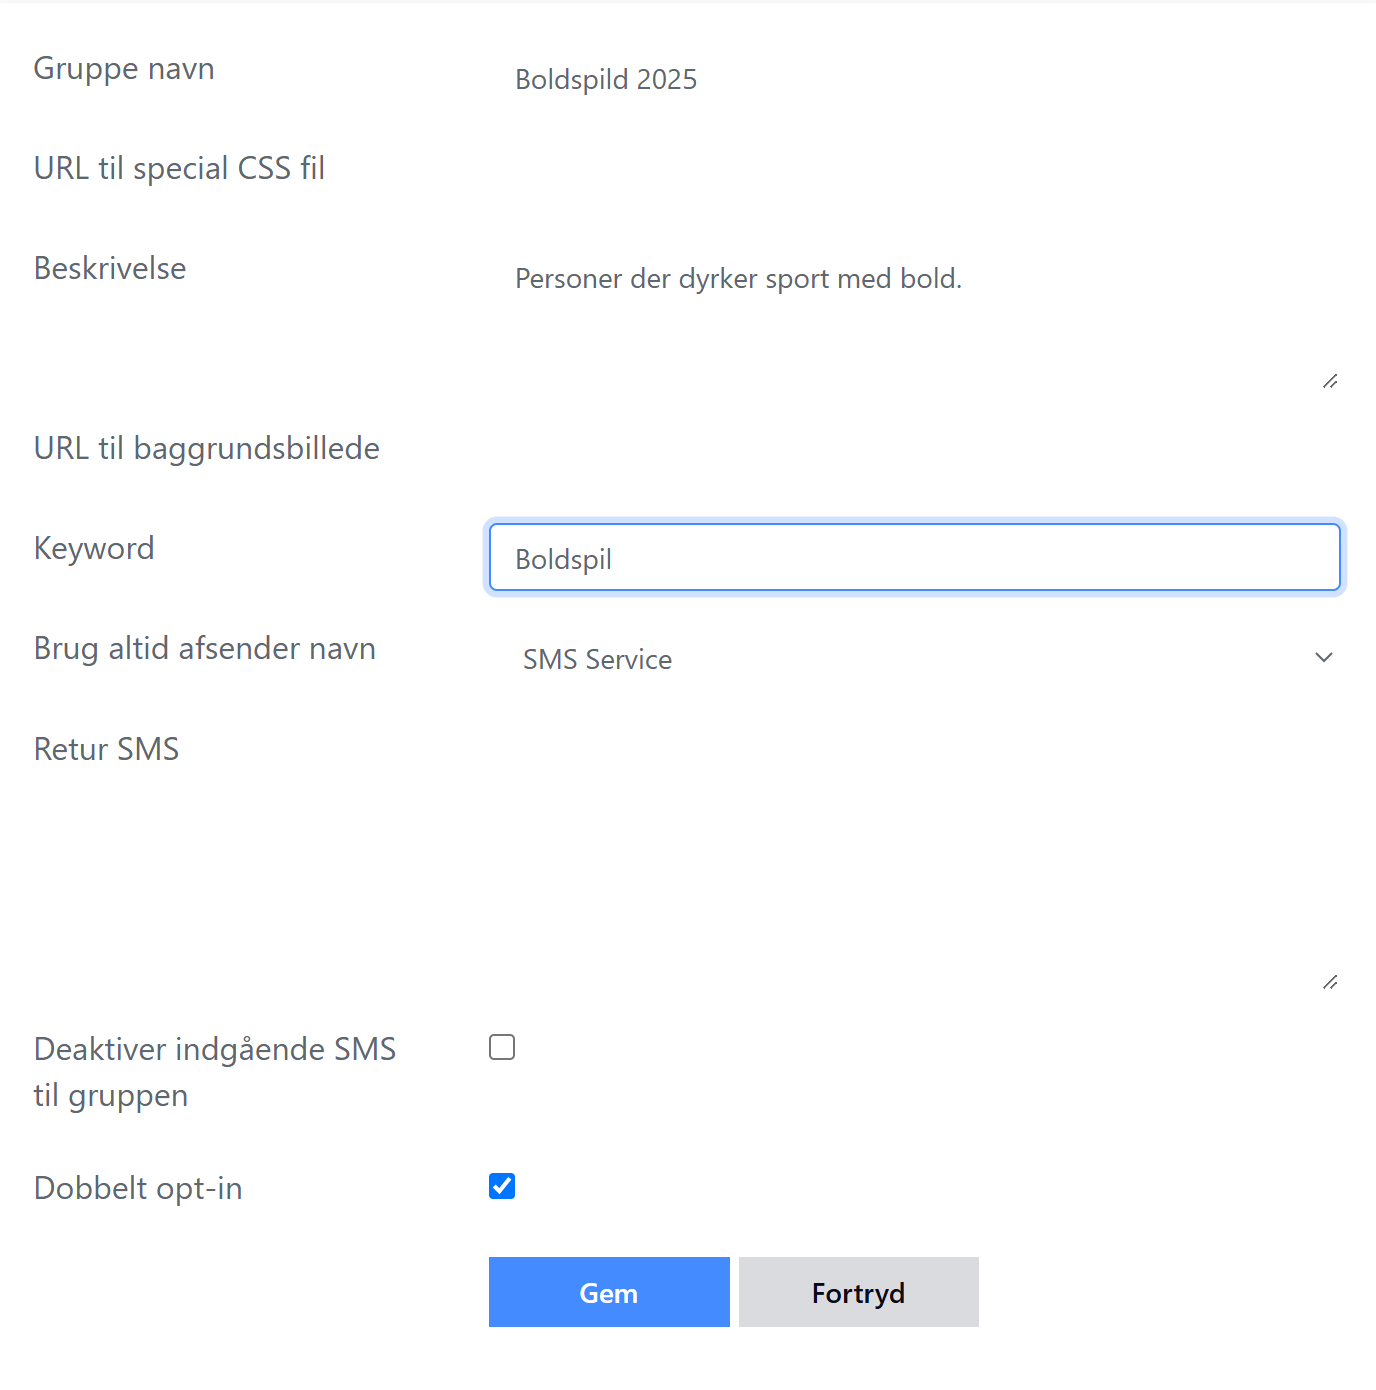
Now you see a screenshot similar to the one on the right here.
Give the group a Keyword. Keyword is the word users should send in the SMS message.
In the Return SMS, you can write a message that the subscriber should receive after signing up. For example, "Thank you for signing up. You will receive news from us about twice a month".
Sender name can also be added.
Check the box "Disable incoming SMS to group"
This means that in this example, where the group has the keyword "Ball games", a person can join the group by sending an SMS to 93700701 with the text
Sign up for ball games
Click on the Gem to save the settings.

Register using QR code
It is also possible to get a QR code that you can put up in the club, store or other places where people come. Here's how you do it:
Follow the instructions above to assign a Keyword to the group.
Once you have saved the keyword group, do the following:
Next to the group, click the pencil to edit the group.
Scroll down the page and find the section How to sign up as shown below

On the far right you can see the QR code that can be used for registration. It is possible to copy it from the page and paste it into e.g. a word document.
Sign up via form on your own website
If you want to subscribe to your list from your website, we also have this option. This is solved with a so-called iFrame. Below you can see the description of this.
To insert our registration form on your own website, you need to insert our link into your html code. How this is done depends on which CMS system (e.g. Word Press, Joomla, Drupal) your website is made in. Our example below applies to websites created in Word Press.
Go to the section How to sign up as described in the QR code section. Here you will find a link to insert into an HTML page on your website. You need to insert the following on your own website
<iframe width="420" height="315" src="https://suresms.com/dk/subscribe/?GroupID=5069&language=da" frameborder="0" allowfullscreen></iframe>
where you replace https://suresms.com/dk/subscribe/?GroupID=5069 with the one under URL in the group settings.
Appearance of the form
By inserting a URL in the field URL to custom CSS file you can place a CSS file on your own website and overwrite the style of the form to fit your website exactly.
Using this feature requires you to be proficient in coding CSS and be able to see the values of the elements. It is for web designers or developers only.
The content of the form
It is possible to change the content of the signup form by using these parameters in your URL.
| Language | da for Danish, es for Spanish, uk for English |
| CountrycodeFieldLabel | What should it say next to the country code selection. |
| PhonenumberFieldLabel | What should be written next to the phone number field. |
| NameFieldLabel | What should be written next to the name field field. |
| NameFieldIsRequired | If it is necessary to enter a name. |
| EmailFieldLabel | What should it say next to the email field. |
| CustomFieldLabel | What should be written next to the CustomField field. |
| PhonenumberPlaceholder | What should be the guiding text in the phone number |
| NamePlaceholder | What should be the guiding text in the name field |
| EmailPlaceholder | What should be the guiding text in the email field. |
| CustomPlaceholder | What should be in the guiding text in CustomPlaceholder |
| ShowNameField | Set =1 if you want to display the name field |
| ShowEmailAddressField | Set =1 if you want to display email address |
| ShowCustomField | Set =1 if you want to show customfield |
| RedirectUrlSubscribe | url where we redirect to once the user has signed up. |
| RedirectUrlUnSubscribe | url where we redirect to when the user has unsubscribed. |
| ConfirmationSMSText | Here you can write the text that recipients will receive when they confirm their subscription to the list. It is important that you insert the code somewhere in the message. This is the merge field used to insert the actual code that will be used to confirm participation. |
A complete URL could look like this
https://suresms.com/dk/subscribe/?GroupID=5069&CulID=2&CountrycodeFieldLabel=Forvalgskode&PhonenumberFieldLabel=Mobiltelefon&CustomFieldLabel=Biltype&PhonenumberPlaceholder=f.eks. 12345678&NamePlaceholder=John Doe&[email protected]&CustomPlaceholder=Ford or Tesla&ShowNameField=1&ShowEmailAddressField=1&ShowCustomField=1
